Sunday, May 22, 2016

Making a washi tape box

So... In the past few months of so, I've been having a weird fascination of washi and deco tape. I've ended up accumulating a whole box full of tapes, both expensive and cheap... But not really had a chance to use them. For one, I don't do scrap booking. And two, when I write notes and stuff... My handwriting is always so messy, it feels like a total waste to use such pretty tape on them. I don't use paper calendars either... So I have no idea what to use the deco tape (and all the pretty stickers that I got too) for.

Well... You can decorate stuff with it. Like your notebooks, stationary, and other belongings... But my notebooks don't quite feel worth the decorating. And my other belongings? I kind of prefer them erm... Tape free. Pasting washi tape all over your desk may look really pretty, but I think it'll give headaches when cleaning the desk... Or if the tape starts coming off? o.o The tapes tend to be not too sticky so removal shouldn't be a problem... But you'll never know what months or years in the Singaporean heat will do to things... Plus, if the tape starts getting peeled off I'd be pretty darn irritated with it...

So well, as I was trying to find *something* to do with all my deco tape... I remembered the duct tape bags that's supposedly in the rage. Saw it a few months ago during Ohno's DIY corner on Shiyagare, and I still remember a little of it so I decided to try.

Ok. So a bit of introduction. What is washi tape? Isn't it the same as deco tape?

Well, not really. Washi tape is well, tape made from washi. Washi (和紙) is basically Japanese paper. Which is paper commonly made from "fibers from the bark of the gampi tree, the mitsumata shrub (Edgeworthia chrysantha), or the paper mulberry, but also can be made using bamboo, hemp, rice, and wheat." Read more in wikipedia here. Washi tape is really thin, but strong. I heard that it might even be as strong as duct tape sometimes! Wow.

So washi tape is like paper tape made from fibers. And deco tape? Well, deco tape is just decorative tape. And it can be made of any material. From plastic to the PVC-ish type... And of course, washi tapes.

There's a lot of different washi tapes designs around. From plain colors to stripes and patterns to cartoon designs like this and this.... No wonder pinterest is exploding with things to do with washi tape.

Decorating boxes and items with tape, including huge pieces of furniture like a table, dresser, or cupboard, or even using it as wall paper seems like a major theme there... But since I don't have anything on hand at the moment that I'd really like to decorate... I thought, 'why not make a mini bag/box with washi tape instead?' And so that's what I did.

I started off with a mini bag as a goal, but... What use is a miniature bag, besides being a pretty decoration? Might as well make is a little bigger so that I could... Actually dump some stuff in there. And so I did. (I still think a mini washi tape bag would be really cute though!)

The washi tape rolls that I chose to use were roughly 2 cm thick. All I knew about making duct tape bags were what little information I recalled from watching the show about 2 months back... In other words, not much. They used a weaving method in the show. And so I did just that.

First up, you have to cut the washi tape, and fold them in half to make washi tape strips.

I randomly went with a length, since I had no idea how much big my final product should be. They ended up being a bit too long and I had to trim of quite a bit at the end... But hey, longer is better than if it's too short!

About 5 stripes in, I searched online to try and see how many stripes I would need... And saw that many of the duct tape bag making methods involved the 'easy way out' of sticking pieces of duct tape together into a square/rectangle/whatever shape. Few people weaved. Dammit! Folding those washi tape stripes into half was hard! By hard, I mean, folding it nicely, without creases, and evenly, without a sticky edge left over on one side. In the end though, it didn't matter that much because I trimmed off a lot of the 'bad' parts, and quite a lot of the final product is well, covered in more washi tape, as you'll see in a bit.

I started weaving the base of the box/bag when I had 6 stripes.

And from there I just added more stripes till I was satisfied with the size of the base. You can see the creases in the stripes from my lousy folding techniques.

Once the base was weaved, it needed to be secured. And what else would you secure it with, but washi tape?

Next came the sides. I would have liked to use one single long stripe to weave all four sides together... But it was a little more difficult for the inexperienced weaver like myself... I settled for weaving each of the sides separately and then washi taping them all into shape. 

Three sides done!

That's it! All the weaving completed! As with all the washi tape folding... Well. Almost.

That's the same thing, with my fingers as a size comparison. Yes, that this is SMALL. Well, the grids on my favourite cutting mat are 1 x 1 cm large, so you get the idea. 

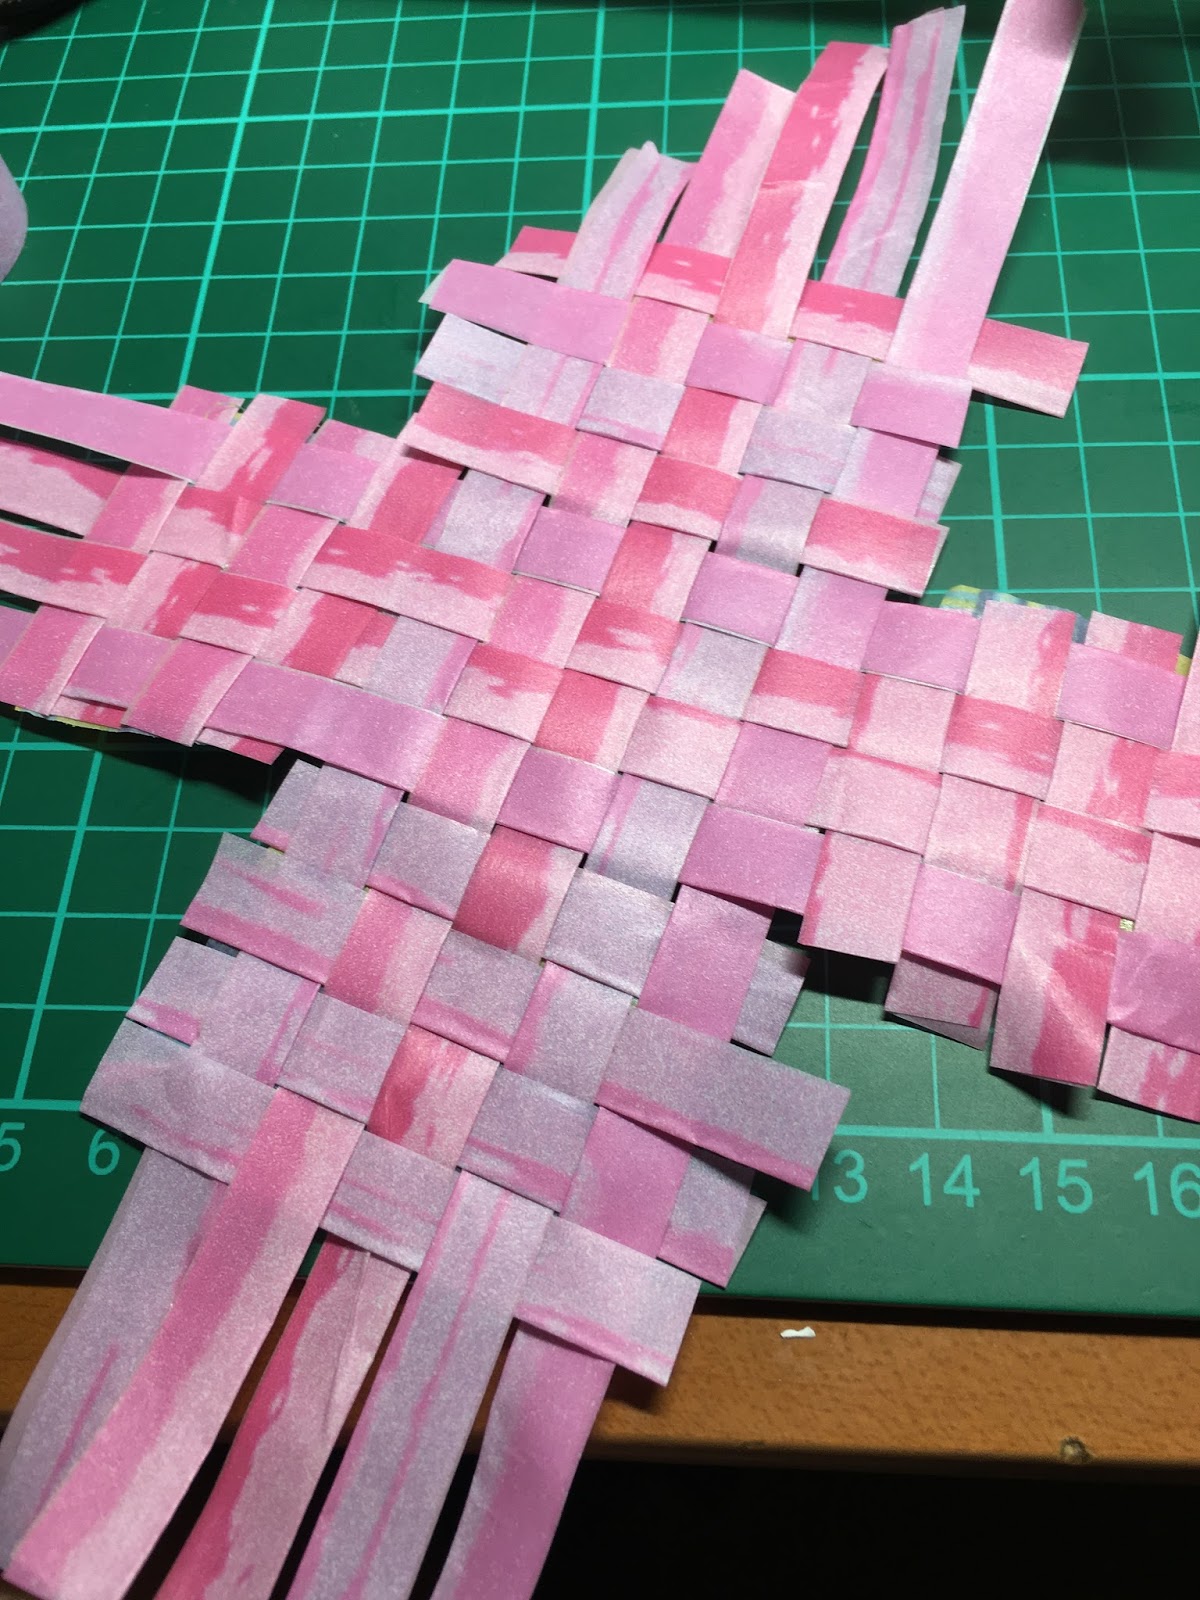
That's the other side of the weaved product, that I intended to use as the 'outside' of the box. All pink and a little boring huh? But well, that's the only patterned tape I have that's 2cm wide... (and well actually it's 2 rolls of tapes, of *slightly* different color...)

The next step is easy. Trimming the edge so that you can tape the box together.

Well, before I started taping the corners together though, I taped down the sides so that they won't split open. For added robustness you know?

Then the side pieces get taped together. With the same shiny tape. I also taped the seems from the inside of the box, again, to make it more robust.

All taped  up!

Almost there now! All you need to do is... Trim the top, and then tape the top edge up!

That's the completed box! With the sliver 'trimming', the outside of the box certainly doesn't look boring anymore!

The inside is more colorful still, with the washi tape securing the weaved stripes.

And that's it! The completed washi tape box. It's approximately 5 x 4 cm large, with a height of about 4 cm. Not too big, but more than large enough to hold my eraser stamps. 

That's it! So instead of decorating a box with washi tape... I *made* a box with washi tape and literally nothing else. I have no idea how I ended up making this instead of doing more *useful* stuff like studying for my JLPT but yeah... Stuff happens. *shrugs* Was really fun though, and with all the cartoon washi/deco tape that I have... I'd definitely love to make more washi tape mini boxes/bags in the future. With a different method maybe, one that would showcase the pretty cartoon patterns. That or instead of folding the tape into half lengthwise, I can do it by the width, or you know, just stick two pieces of washi tape together. We'll see! 


Saturday, May 7, 2016

Eraser Stamp Numbers 25 and 26

Ok. I actually carved out these guys months ago. Literally. Like way back in February. And I actually drew them in Dec last year. Hence the Xmas themed bells.

But well... Life and procrastination got in the way of posting the designs... Oh wells.

That's no. 25. The muti-layered heart. 


And the Xmas bells.

Posting this just in time for mother's day huh? Lol.

Monday, May 2, 2016

Shrinking Rainbows - Playing with heat shrink plastic

So... I got some heat shrink plastic for crafts!

I got these long ago! Like months. Like last year. Yup, it's May already now... Pretty darn long ago isn't it?

Anyway... I got them with the goal of making something Arashic from them to use as gifts for DNA... But I didn't make anything then, so it ended up sitting on my desk for months till the prize giving season for Storm Freaks rolled around. 

The instructions are simple. Color the plastic sheet using permanent markers with whatever design your heart desire, then heat it up in the oven to shrink the plastic. The plastic will shrink to roughly a quarter of the original size.

But well first, I had to cut the sheet. The sheet I got came in B3 size, so after some measurements and calculations... I figured that I could only make 4 rainbows with a single sheet. *gasp* The plastic sure shrinks a lot!

There, all cut up! Oh! I just marked the sheets with whiteboard markers, since I have tons of them sitting beside me. Permanent markers works too of course... But whiteboard markers are easier to erase if you make mistakes. 
I've already printed out a template for myself to trace - well it's there in the background since a few photos up. They say that messy tables make people more creative. Well I do feel that way, and sometimes having messy/cluttered tables is just convenient. So I was thinking that I needed some paper clip or something to secure the plastic sheet to my template. What else would my eye chance upon other than a big blob of white tack sitting on my cupboard door? Left overs from a previous decorating attempt. Just perfect. It works better than paper clips and binders too. 


Finally, my trusty collection of Sharpie markers can be put to use!


Coloring the rainbow. Oh yeah. It's much easier to color first and outline with black later. Common sense, I know...

Of course, my trusty bottle of ethanol is there to help my my hand goes out of control. Lol. I'm bad with writing instruments, really. 

So I colored...

And colored...


And colored some more. 

That's the finished product! Boy did I take a long time coloring this very first one. I got way faster with the subsequent rainbows...

So I cut the rainbow out, taking care not to leave any sharp edges. Also punched a hole at the top for a piece of string or whatever to hang the finished product with. I found that the plastic tends to chip when cutting. Holding the scissors parallel to the plastic sheet, instead of at an angle, reduces the chances of that happening. The chipped edges doesn't seem to affect the quality of the final product though.

It took me two whole weeks before I finally got round to heat shrinking the plastic... Because the oven was hidden somewhere far away... I finally dug it out yesterday though! 


And that's the finished product! I dropped it a few times during the heating from panic and stuff, which might have lead to the cracked edges. Also I poked around too much with the chopsticks and that lead to the paint being smeared... Anyway, pretty good for a first trial I'd say. Just 5 more to make lol.

More coloring.


In the oven it goes!


Sorry, it's really dark in the oven so you can't see it clearly from the photo (and I didn't think of turning on the flash)

But well, the plastic totally gets crumpled up during the heating process! It's ok, just let it be. It'll eventually flatten out once everything completely shrinks. The crumpling is due to the uneven heating of the plastic - things like the proximity to the heat source and the drawing on the plastic affects the heating and therefore shrinking rate. 

Since I was making 5 to give away, plus the first as a trial... I had a lot of runs to try different methods of shrinking and to perfect it. 

Here's a rundown of what happened in each run.

1) Poked the plastic a bit too much, and I even flipped it around at the end, leaving a rainbow mark on the aluminium foil. 

2) Tried putting it flat, all the way. Minimal poking. Only to find that at the end... The stupid plastic is stuck to the foil! GOSH! Managed to take it out after loads of wrestling... But it's not that flat anymore... Oh wells... :(

3) Tried putting a piece of crumpled aluminium foil at the bottom, as suggested by the package instructions. It still gets stuck! Plus, the rough contour of the foil left marks on the back of the plastic. Darn.

4 - 6) I did the last three in succession, I colored them all first then mass 'fired' them. So the first of the batch turned out pretty ok. No more crumpled foil. I just made sure to move it around often enough, and then flattened the plastic after heating with a glass slab pot holder thing. (I flattened it that way from the 2nd try onwards.) Turned out pretty good. So I proceeded to throw the next piece in the still hot oven. Opps. Not too good. The oven is too hot... And the plastic crumpled up so much that it folded upon itself! It's alright in the sense that it'll 'uncrumple' once the heating is completed... But alas! My drawing! Parts of the paint came off and got stuck to other parts because of the crumpling! Darn. Was the same for the very last piece too... *Sigh* One of pieces has two dents - chopstick marks - because it got stuck on the chopstick a little while trying to move it around.

So... Some conclusions/takeaways from my experiments.

1) Oh let's start from the very basics. Cover your oven tray/rack with aluminium foil. Unless you're not planning to use the oven for food anymore. Also, use a pair of disposable chopsticks too (Or one that won't use used for food anymore.) If you can't use chopsticks, get some tweezers or tongs, but make sure you get those without sharp edges, or they'll easily mark the plastic. 

Paint/marker coloring can get on anything it touches, and I wouldn't recommend handling food with paint contaminated utensils...

2) Lay the plastic piece flat on the foil. The initial stages are fine, since the plastic will curl up and all. But later on, once it gets flatter, pick it up and move it around every few seconds so that it doesn't stick to the foil. Overall the process takes a minute or less. So it's really quick.

3) Don't put the plastic facedown. And *try* not to touch the painted part with your chopsticks. Of course, it depends on how much unpainted area you have left with your design.

4) Turn down that heat! I set my oven to roughly 150 °C. It's fine for the first piece - I put the plastic in when the oven is still cold. But if you're shrinking multiple pieces at once, you might want to try a lower temperature. Say 100 °C or something... So that the oven won't be too hot for the subsequent pieces. I actually turned the oven off a bit for the last two pieces, but it was still too hot :(. Of course, this depends on the size of your plastic piece too. If it's too small to begin with, the crumpling might not be a concern at all.

5) You can reheat the plastic if it's not straight enough. Just be sure to have something to press/flatten the plastic with once you are done. 

Of course, I don't have to warn you that the oven, foil and plastic will get really hot right? Be careful when handling them! The plastic especially. It's a poor heat conductor so it might not feel that hot when you first touch it... But another second more and then... XD. As a poor heat conductor, it stays hot for pretty long after heating too, so beware!

6) The plastic does shrink more if you continue heating it. Even after it becomes all flat. I traced all my rainbows from the same template, but they ended up being different sizes - just the drawing part, not comparing the overall size of the plastic pieces since I cut them freehand.

It *might* be more convenient to use a heat gun instead of the oven. But I couldn't find any cheap, light duty heat gun for crafts. The only one I could find was a 100+++ dollars Black & Decker heat gun. Nah. I ain't no using heat guns for any construction... Just heat shrinking a few pieces of plastic.

So... The end results.


That's a size comparison of the original VS the final product. It really shrunk a lot huh? 

That's all for now I guess! Maybe next time I'll try with Arashi logos or something. Think any fans will be interested to buy these things? I like making 'em but I got no use for them, beside collecting pieces of colored plastic and cluttering my desk even more! Ha!

PS: Did the rainbow look familiar? I did it a long time ago with the Assembly app :P